¶ 一、 Widget基类
本控件常见实现类有:BaseCell,BaseTextCell,SelectCell等,若你要自定义控件可继承这些类。
本章我们将介绍如何开发自定义控件。在第二节开发了一个进度条件,该例子说明了如何开发纯展示的单元格控件。第三节将介绍如何开发一个交互性页面,例如某单元格编辑激活时弹出一个自定义页面,用户在页面交互确认后设置该单元格内容。
¶ 二、 展示自定义(进度条)
如果你只是修改默认的展示,不需对编辑进行调整,例如本例的进度条,从原来展示0.5,变更为用颜色进度条来完成展示进度,适用本节内容。
¶ 2.1 类继承
继承BaseTextCell,代码如下:
 class ProgressCell extends window.websheet.Model.BaseTextCell {
    protected name: string = 'Progress';//控件的名称
     /**
     *
     * @param x  单元格的开始坐X标
     * @param y   单元格的开始坐Y标
     * @param width width 单元格的宽度
     * @param height height单元格的高度
     * @param Document
     */
    constructor(canvas, ctx, x, y, width, height, document) {
        super(canvas, ctx, x, y, width, height, document);//必须调用父类
         //初始化你自己的变量
    }

    public Draw() {
        super.Draw();//必须调用父类
    //这里你的代码

    }

}
¶ 2.2 上下文
上下文是用来在你的应用程序和自定义控件传递参数使用,在进度条中上下文如下:
| 参数 | 说明 | 是否必须 |
|---|---|---|
| background | 背景颜色,例如'#eee' | 否 |
| foreground | 前景颜色,'red' | 否 |
| textColor | 文本颜色 | 否 |
在使用进度条的时,可以用上下文来设置进度条的外观,下面代码设置一个红色进度条:
  let redoptions={isVertical:false,
      background:  '#eee',
         foreground:  'red',
        textColor:  '#333',
   };
   activeSheet.SetCellValue('B3',0.01);//设置完成度

   activeSheet.setCellEditor('B3',       websheet.Model.ProgressCell,redoptions);
在自定义控件中通过SetContex函数可以读取上面的信息,进度条中的代码如下:
 	public SetContex(contex: object) {
        this.options = contex;
        //从 options对象获取本控件需要的参数

        if (this.options && this.options != undefined) {

            if ("isVertical" in this.options) {
                this.isVertical = this.options.isVertical as boolean;
            }

            if ("background" in this.options) {
                this.background = this.options.background as string;
            }

            if ("foreground" in this.options) {
                this.foreground = this.options.foreground as string;
            }

            if ("textColor" in this.options) {
                this.textColor = this.options.textColor as string;
            }
        }
    }
¶ 2.3 绘制内容的调整
重新绘制不要超出构造函数的x, y, width, height否则影响其他单元格的展示。
最后开始绘制带颜色的进度条,代码如下:
  public Draw() {
        super.Draw();

        /**
         * 清除原有表格区域内容,
         */
        this.ctx.clearRect(this.x, this.y, this.width - 1, this.height - 1);
        try {
            this.progress = parseFloat(this.drawText.toString()) * 100;
        } catch (e) {
            this.progress = 0;
        }
        /**
         * 绘制背景
         */
        this.#drawRoundedRect(
            this.x + 1,
            this.y + 1,
            this.width - 2,
            this.height - 2,
            this.radius,
            this.background
        );

        // 绘制进度
        const progressWidth = this.isVertical
            ? this.width
            : this.width * (this.progress / 100);

        const progressHeight = this.isVertical
            ? this.height * (this.progress / 100)
            : this.height;

        this.#drawRoundedRect(
            this.x,
            this.isVertical
                ? (this.y + this.height - progressHeight) + progressHeight * 0.15
                : this.y + progressHeight * 0.15,
            progressWidth,
            progressHeight * 0.7,
            this.radius,
            this.foreground
        );
        // 绘制文字
        this.ctx.fillStyle = this.textColor;
        this.ctx.textAlign = 'center';
        this.ctx.textBaseline = 'middle';
        this.ctx.fillText(
            `${Math.round(this.progress)}%`,
            this.x + this.width / 2,
            this.y + this.height / 2
        );
    }
实现的效果如下:
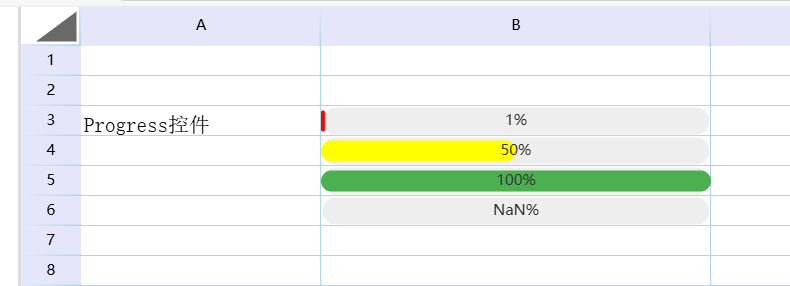
使用进度条参考这里:进度条
¶ 三、 自定义弹出编辑器
本章节将介绍如何开发一个具有交互性的页面,例如某单元格编辑激活时弹出一个自定义的页面,在页面交互确认后设置该单元格内容。
我们将此节分成两部分讲解.
- 3.1 章节说明了如何构建展示页面,及其展示页面的交互代码
- 3.2 章节说明自定义弹出编辑器和websheet控件的交互
¶ 3.1 弹出页面部分
¶ 3.1.1 展示页面
展示页面HTML的代码如下:
  <div id="myModal" class="modal">
    <div class="modal-content">
      <form id="customerForm">
        <div class="form-group">
          <label>客户代码:</label>
          <input type="text" id="customerCode" readonly>
        </div>
        <div class="form-group">
          <label>客户名称:</label>
          <input type="text" id="customerName" required>
        </div>
        <div class="form-group">
          <label>地址:</label>
          <input type="text" id="address">
        </div>
        <div class="form-group">
          <label>网站:</label>
          <input type="url" id="website">
        </div>
        <div class="button-group">
          <button type="button" id="submitForm">确认</button>
          <button type="button" id="closeModal">取消</button>
        </div>
      </form>
    </div>
  </div>
¶ 3.1.2 CSS
展示页面HTML的CSS代码如下:
  <style>

    .modal {
      display: none;
      position: fixed;
      z-index: 1;
      left: 0;
      top: 0;
      width: 100%;
      height: 100%;
      background-color: rgba(0, 0, 0, 0.4);
      justify-content: center;
      align-items: center;
    }


    .modal-content {
      background-color: #fff;
      padding: 20px;
      border-radius: 5px;
      width: 400px;
      box-shadow: 0 4px 8px 0 rgba(0, 0, 0, 0.2);
    }

    /* 表单布局 */
    .form-group {
      margin: 15px 0;
    }

    label {
      display: block;
      margin-bottom: 5px;
    }

    input {
      width: 95%;
      padding: 8px;
    }

    /* 按钮组 */
    .button-group {
      text-align: right;
      margin-top: 20px;
    }

    button {
      padding: 8px 15px;
      margin-left: 10px;
      cursor: pointer;
    }
  </style>
¶ 3.1.3 控制代码
这里定义了一个PopFrom类,此类定义成了一个静态类,在初始化时给页面的按钮绑定了事件。
¶ 构造函数
    class PopFrom {
      static #instance;
      constructor() {
        if (!PopFrom.#instance) {
          PopFrom.#instance = this;
          document.getElementById('closeModal').addEventListener('click', this.closeModal);
          this.submitDate = this.submitDate.bind(this);//此处不可以缺少
          document.getElementById('submitForm').addEventListener('click', this.submitDate);
          this.click_number = 1;
        }
        return PopFrom.#instance;
      }
注意此处代码:this.submitDate = this.submitDate.bind(this);
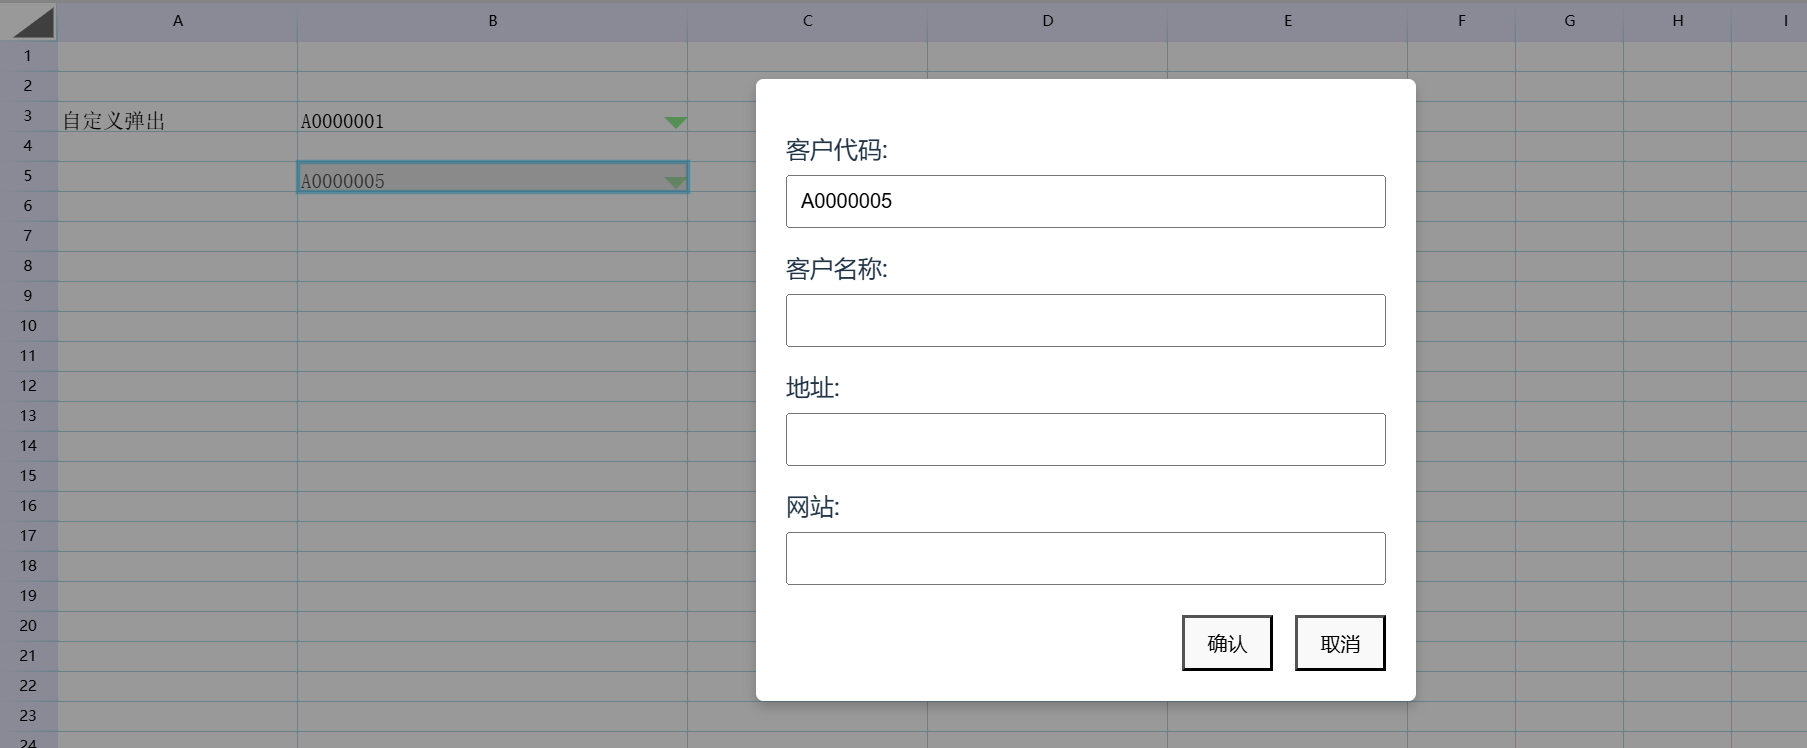
¶ 激活展示页面
下面定义了激活页面的代码,代码如下:
    openModal(code, editCell) {
        document.getElementById('customerCode').value = code;
        document.getElementById('myModal').style.display = 'flex';
        this.EditCell = editCell;
    }
此方法是下面编辑器调用的入口,这里把页面设置成可见模式,并把激活的编辑器类传递给展示页面。
¶ 展示页面确认提交数据
点击页面确认代码如下:
      submitDate() {
        const formData = {
          code: document.getElementById('customerCode').value,
          name: document.getElementById('customerName').value,
          address: document.getElementById('address').value,
          website: document.getElementById('website').value
        };
        console.log('你的数据:', formData);
        //修改单元格数据 这里设置ABCDEFG
        this.EditCell.SetCellValue('ABCDEFG' + this.click_number++);
        this.closeModal();
      }
在这里我们通过this.EditCell.SetCellValue()设置了激活单元格的内容 ;通过this.closeModal()隐藏了页面。
¶ 展示页面取消
隐藏页面代码如下:
      closeModal() {
        document.getElementById('myModal').style.display = 'none';
      }
¶ 3.2 弹出编辑器部分
¶ 3.2.1 类继承
自定义编辑器不同与展示,此继承的基类为BaseCell ,代码如下:
class PopEditCell extends window.websheet.Model.BaseCell {

     /**
     *
     * @param x  单元格的开始坐X标
     * @param y   单元格的开始坐Y标
     * @param width width 单元格的宽度
     * @param height height单元格的高度
     * @param Document
     */
    constructor(canvas, ctx, x, y, width, height, document) {
        super(canvas, ctx, x, y, width, height, document);//必须调用父类
         //初始化你自己的变量
     this.popFrom = new PopFrom();//这里使用3.1章节的类,用来激活展示页面
     this.name = 'PopEditCell';//控件的名称
    }
    public Draw() {
        super.Draw();//必须调用父类
    //这里你的展示代码
    }

}
¶ 3.2 上下文
参见:2.2 上下文。
¶ 3.2 绘制内容的调整
为了给用户更好交互体验,有必要通过绘制鲜明的图表等信息告诉用户此单元格可以交互,这里在单元格的右下角增加了一个绿色倒立三角。
public Draw() {
      super.Draw();//必须调用父类
      //这里你的代码
      this.drawArrowWithPath();
    }

    // 绘制箭头和方框
    drawArrowWithPath() {


      // 绘制绿色倒三角
      this.ctx.fillStyle = 'lightgreen';
      this.ctx.beginPath();
      this.ctx.moveTo(this.x + this.width-16, this.y + this.height-10);               // 右下角顶点
      this.ctx.lineTo(this.x + this.width, this.y + this.height-10); // 向左延伸底边
      this.ctx.lineTo(this.x + this.width-8, this.y + this.height-2); // 向上延伸侧边
      this.ctx.closePath();
      this.ctx.fill();
    }
¶ 3.4 激活编辑控件
激活自定编辑器有两种模式,一种是单击模式,一种是双击模式。根据需求选其一。
¶ 3.3.1 单击触发
     public CellClick(event: MouseEvent): void {
        //this.popFrom.openModal(this.drawText, this);
     }
¶ 3.3.2 双击触发
    public CellDbClick(event: MouseEvent): void {
      this.popFrom.openModal(this.value, this);
    }
在这里调用3.1章节定义类openModal方法激活了展示页面,这里把单元格的值和编辑器传递给了展示页面的代码,最后用户确认后调用传递的this方法的SetCellValue把控制权交还给websheet控件。
¶ 3.4 结果展示

¶ 3.5 部分代码
 <!DOCTYPE html>
<html lang="en">
<head>
  <style>
    .modal {
      display: none;
      position: fixed;
      z-index: 1;
      left: 0;
      top: 0;
      width: 100%;
      height: 100%;
      background-color: rgba(0, 0, 0, 0.4);
      justify-content: center;
      align-items: center;
    }
    .modal-content {
      background-color: #fff;
      padding: 20px;
      border-radius: 5px;
      width: 400px;
      box-shadow: 0 4px 8px 0 rgba(0, 0, 0, 0.2);
    }

    /* 表单布局 */
    .form-group {
      margin: 15px 0;
    }

    label {
      display: block;
      margin-bottom: 5px;
    }

    input {
      width: 95%;
      padding: 8px;
    }

    /* 按钮组 */
    .button-group {
      text-align: right;
      margin-top: 20px;
    }

    button {
      padding: 8px 15px;
      margin-left: 10px;
      cursor: pointer;
    }
  </style>
  <meta charset="UTF-8">
  <title>websheet Demo</title>
  <link rel="stylesheet" href="../dist/style.css">
</head>
<body>
  <div id="myModal" class="modal">
    <div class="modal-content">
      <form id="customerForm">
        <div class="form-group">
          <label>客户代码:</label>
          <input type="text" id="customerCode" readonly>
        </div>
        <div class="form-group">
          <label>客户名称:</label>
          <input type="text" id="customerName" required>
        </div>
        <div class="form-group">
          <label>地址:</label>
          <input type="text" id="address">
        </div>
        <div class="form-group">
          <label>网站:</label>
          <input type="url" id="website">
        </div>
        <div class="button-group">
          <button type="button" id="submitForm">确认</button>
          <button type="button" id="closeModal">取消</button>
        </div>
      </form>
    </div>
  </div>

  <div id='yourElement'>
  </div>
  <script type="module">

    class PopFrom {

      static #instance;
      constructor() {
        if (!PopFrom.#instance) {
          PopFrom.#instance = this;

          document.getElementById('closeModal').addEventListener('click', this.closeModal);
          this.submitDate = this.submitDate.bind(this);
          document.getElementById('submitForm').addEventListener('click', this.submitDate);
          this.click_number = 1;
        }
        return PopFrom.#instance;
      }

      openModal(code, editCell) {
        document.getElementById('customerCode').value = code;
        document.getElementById('myModal').style.display = 'flex';
        this.EditCell = editCell;
      }

      submitDate() {
        const formData = {
          code: document.getElementById('customerCode').value,
          name: document.getElementById('customerName').value,
          address: document.getElementById('address').value,
          website: document.getElementById('website').value
        };
        console.log('你的数据:', formData);
        //修改单元格数据 这里设置ABCDEFG
        this.EditCell.SetCellValue('ABCDEFG' + this.click_number++);
        this.closeModal();
      }

      closeModal() {
        document.getElementById('myModal').style.display = 'none';
      }
    }

    let yourElement = document.getElementById("yourElement");
    let wsheet = new websheet('HTML', yourElement);


    class PopEditCell extends websheet.Model.BaseCell {


      /**
      *
      * @param x  单元格的开始坐X标
      * @param y   单元格的开始坐Y标
      * @param width width 单元格的宽度
      * @param height height单元格的高度
      * @param Document
      */
      constructor(canvas, ctx, x, y, width, height, document) {
        super(canvas, ctx, x, y, width, height, document);//必须调用父类
        //初始化你自己的变量
        this.popFrom = new PopFrom();
        this.name = 'PopEditCell';//控件的名称
      }

      Draw() {
        super.Draw();//必须调用父类
        //这里你的代码
        this.drawArrowWithPath();
      }

      // 绘制箭头和方框
      drawArrowWithPath() {
        // 绘制绿色倒三角
        this.ctx.fillStyle = 'lightgreen';
        this.ctx.beginPath();
        this.ctx.moveTo(this.x + this.width - 16, this.y + this.height - 10);               // 右下角顶点
        this.ctx.lineTo(this.x + this.width, this.y + this.height - 10); // 向左延伸底边
        this.ctx.lineTo(this.x + this.width - 8, this.y + this.height - 2); // 向上延伸侧边
        this.ctx.closePath();
        this.ctx.fill();
      }

      // public CellClick(event: MouseEvent): void {
      //   alert('CellClick');
      // }

      CellDbClick(event) {
        //alert('CellDbClick');
        this.popFrom.openModal(this.value, this);
      }

    }


    /**
    * 第一步 获取激活sheet
    */


    let activeSheet = wsheet.ActiveSheet();

    activeSheet.SetCellValue('A3', '自定义弹出');

    /**
    * 第二步 自定义编辑器,并注册
    */

    activeSheet.SetCellValue('B3', 'A0000001');//

    activeSheet.setCellEditor('B3', PopEditCell);


    activeSheet.SetCellValue('B5', 'A0000005');//
    activeSheet.setCellEditor('B5', PopEditCell);


    /**
    * 第三步   重新绘制表格
    */
    activeSheet.setColWidth(1, 160);
    activeSheet.setColWidth(2, 260);
    activeSheet.setColWidth(3, 160);
    activeSheet.setColWidth(4, 160);
    activeSheet.setColWidth(5, 160);
    activeSheet.WorkFormula(); //重建公式
    activeSheet.cacl();//公式计算

    wsheet.BuildSheet();
    wsheet.Draw();

  </script>

  <script type="text/javascript" src="../dist/websheet...."></script>
</body>

</html>