¶ I. Widget Base Class
Common implementation classes for this control include: BaseCell, BaseTextCell, SelectCell, etc. If you want to customize a control, you can inherit from these classes.
This chapter will introduce how to develop custom controls. In Section 2, a progress condition was developed, which illustrates how to develop a pure display cell control. Section 3 will introduce how to develop an interactive page, for example, when a cell is activated for editing, a custom page pops up, and the user interacts with the page to set the cell content after confirmation.
¶ II. Display Customization (Progress Bar)
If you only need to modify the default display without adjusting the editing, such as in this example of a progress bar, where the original display of 0.5 is changed to a color progress bar to show the progress, this section is applicable.
¶ 2.1 Class Inheritance
Inherit from BaseTextCell, as shown in the code below:
class ProgressCell extends window.websheet.Model.BaseTextCell {
    protected name: string = 'Progress'; // Name of the control
    /**
     *
     * @param x  X-coordinate of the cell's starting position
     * @param y   Y-coordinate of the cell's starting position
     * @param width Width of the cell
     * @param height Height of the cell
     * @param Document
     */
    constructor(canvas, ctx, x, y, width, height, document) {
        super(canvas, ctx, x, y, width, height, document); // Must call the parent class
        // Initialize your own variables
    }

    public Draw() {
        super.Draw(); // Must call the parent class
        // Your code here
    }
}
¶ 2.2 Context
The context is used to pass parameters between your application and the custom control. In the progress bar, the context is as follows:
| Parameter | Description | Required |
|---|---|---|
| background | Background color, e.g., '#eee' | No |
| foreground | Foreground color, e.g., 'red' | No |
| textColor | Text color | No |
When using the progress bar, you can use the context to set its appearance. The following code sets a red progress bar:
  let redoptions = {
      isVertical: false,
      background: '#eee',
      foreground: 'red',
      textColor: '#333'
  };
  activeSheet.SetCellValue('B3', 0.01); // Set the completion degree
  activeSheet.setCellEditor('B3', websheet.Model.ProgressCell, redoptions);
In the custom control, the SetContex function can be used to read the above information. The code in the progress bar is as follows:
public SetContex(contex: object) {
    this.options = contex;
    // Retrieve the required parameters for this control from the options object

    if (this.options && this.options != undefined) {
        if ("isVertical" in this.options) {
            this.isVertical = this.options.isVertical as boolean;
        }

        if ("background" in this.options) {
            this.background = this.options.background as string;
        }

        if ("foreground" in this.options) {
            this.foreground = this.options.foreground as string;
        }

        if ("textColor" in this.options) {
            this.textColor = this.options.textColor as string;
        }
    }
}
¶ 2.3 Adjusting the Drawing Content
When redrawing, do not exceed the x, y, width, height specified in the constructor, otherwise it will affect the display of other cells.
Finally, start drawing the colored progress bar. The code is as follows:
public Draw() {
    super.Draw();

    /**
     * Clear the original table area content
     */
    this.ctx.clearRect(this.x, this.y, this.width - 1, this.height - 1);
    try {
        this.progress = parseFloat(this.drawText.toString()) * 100;
    } catch (e) {
        this.progress = 0;
    }
    /**
     * Draw the background
     */
    this.#drawRoundedRect(
        this.x + 1,
        this.y + 1,
        this.width - 2,
        this.height - 2,
        this.radius,
        this.background
    );

    // Draw the progress
    const progressWidth = this.isVertical
        ? this.width
        : this.width * (this.progress / 100);

    const progressHeight = this.isVertical
        ? this.height * (this.progress / 100)
        : this.height;

    this.#drawRoundedRect(
        this.x,
        this.isVertical
            ? (this.y + this.height - progressHeight) + progressHeight * 0.15
            : this.y + progressHeight * 0.15,
        progressWidth,
        progressHeight * 0.7,
        this.radius,
        this.foreground
    );
    // Draw text
    this.ctx.fillStyle = this.textColor;
    this.ctx.textAlign = 'center';
    this.ctx.textBaseline = 'middle';
    this.ctx.fillText(
        `${Math.round(this.progress)}%`,
        this.x + this.width / 2,
        this.y + this.height / 2
    );
}
The implementation effect is as follows:
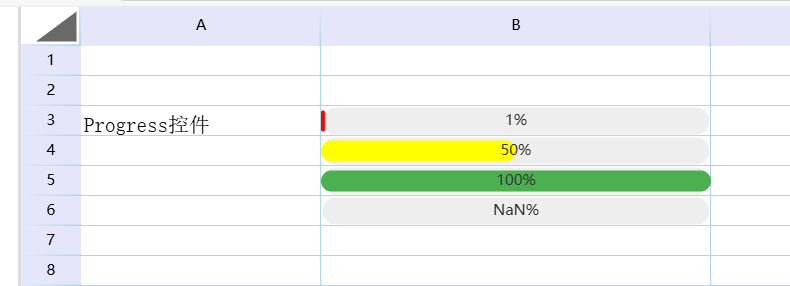
For more information on using the progress bar, see: Progress Bar
¶ III. Custom Pop-Up Editor
This chapter will introduce how to develop an interactive page, for example, when a cell is activated for editing, a custom page pops up, and the user interacts with the page to set the cell content after confirmation.
We will divide this section into two parts:
- Section 3.1 explains how to build the display page and its interaction code.
- Section 3.2 explains how to integrate the custom pop-up editor with the websheet control.
¶ 3.1 Pop-Up Page Section
¶ 3.1.1 Display Page
The HTML code for the display page is as follows:
<div id="myModal" class="modal">
    <div class="modal-content">
      <form id="customerForm">
        <div class="form-group">
          <label>Customer Code:</label>
          <input type="text" id="customerCode" readonly>
        </div>
        <div class="form-group">
          <label>Customer Name:</label>
          <input type="text" id="customerName" required>
        </div>
        <div class="form-group">
          <label>Address:</label>
          <input type="text" id="address">
        </div>
        <div class="form-group">
          <label>Website:</label>
          <input type="url" id="website">
        </div>
        <div class="button-group">
          <button type="button" id="submitForm">Confirm</button>
          <button type="button" id="closeModal">Cancel</button>
        </div>
      </form>
    </div>
  </div>
¶ 3.1.2 CSS
The CSS code for the display page is as follows:
<style>

    .modal {
      display: none;
      position: fixed;
      z-index: 1;
      left: 0;
      top: 0;
      width: 100%;
      height: 100%;
      background-color: rgba(0, 0, 0, 0.4);
      justify-content: center;
      align-items: center;
    }


    .modal-content {
      background-color: #fff;
      padding: 20px;
      border-radius: 5px;
      width: 400px;
      box-shadow: 0 4px 8px 0 rgba(0, 0, 0, 0.2);
    }

    /* Form layout */
    .form-group {
      margin: 15px 0;
    }

    label {
      display: block;
      margin-bottom: 5px;
    }

    input {
      width: 95%;
      padding: 8px;
    }

    /* Button group */
    .button-group {
      text-align: right;
      margin-top: 20px;
    }

    button {
      padding: 8px 15px;
      margin-left: 10px;
      cursor: pointer;
    }
  </style>
¶ 3.1.3 Control Code
Here, a PopFrom class is defined, which is made into a static class, and events are bound to the page's buttons during initialization.
¶ Constructor
class PopFrom {
    static #instance;
    constructor() {
        if (!PopFrom.#instance) {
            PopFrom.#instance = this;
            document.getElementById('closeModal').addEventListener('click', this.closeModal);
            this.submitDate = this.submitDate.bind(this); // This line cannot be omitted
            document.getElementById('submitForm').addEventListener('click', this.submitDate);
            this.click_number = 1;
        }
        return PopFrom.#instance;
    }
Note this code:
this.submitDate = this.submitDate.bind(this);
¶ Activate Display Page
The code to activate the page is as follows:
openModal(code, editCell) {
    document.getElementById('customerCode').value = code;
    document.getElementById('myModal').style.display = 'flex';
    this.EditCell = editCell;
}
This method is the entry point called by the editor below. It sets the page to visible mode and passes the activated editor class to the display page.
¶ Confirm Submission from Display Page
The code for clicking the confirmation button on the page is as follows:
submitDate() {
    const formData = {
        code: document.getElementById('customerCode').value,
        name: document.getElementById('customerName').value,
        address: document.getElementById('address').value,
        website: document.getElementById('website').value
    };
    console.log('Your data:', formData);
    // Modify the cell data by setting 'ABCDEFG'
    this.EditCell.SetCellValue('ABCDEFG' + this.click_number++);
    this.closeModal();
}
Here, we use this.EditCell.SetCellValue() to set the content of the activated cell and this.closeModal() to hide the page.
¶ Cancel Display Page
The code to hide the page is as follows:
closeModal() {
    document.getElementById('myModal').style.display = 'none';
}
¶ 3.2 Pop-Up Editor Section
¶ 3.2.1 Class Inheritance
Unlike display customization, the base class for custom editors is BaseCell. The code is as follows:
class PopEditCell extends window.websheet.Model.BaseCell {

    /**
    *
    * @param x  X-coordinate of the cell's starting position
    * @param y   Y-coordinate of the cell's starting position
    * @param width Width of the cell
    * @param height Height of the cell
    * @param Document
    */
    constructor(canvas, ctx, x, y, width, height, document) {
        super(canvas, ctx, x, y, width, height, document); // Must call the parent class
        // Initialize your own variables
        this.popFrom = new PopFrom(); // Use the class from Section 3.1 to activate the display page
        this.name = 'PopEditCell'; // Name of the control
    }
    public Draw() {
        super.Draw(); // Must call the parent class
        // Your display code here
        this.drawArrowWithPath();
    }
}
¶ 3.2 Context
See: Section 2.2 Context.
¶ 3.2 Adjusting the Drawing Content
To provide a better interactive experience for users, it is necessary to draw a distinct chart or other information to inform users that this cell is interactive. Here, a green inverted triangle is added to the bottom-right corner of the cell.
public Draw() {
    super.Draw(); // Must call the parent class
    // Your code here
    this.drawArrowWithPath();
}

// Draw arrow and box
drawArrowWithPath() {
    // Draw a green inverted triangle
    this.ctx.fillStyle = 'lightgreen';
    this.ctx.beginPath();
    this.ctx.moveTo(this.x + this.width - 16, this.y + this.height - 10); // Bottom-right vertex
    this.ctx.lineTo(this.x + this.width, this.y + this.height - 10); // Extend the base to the left
    this.ctx.lineTo(this.x + this.width - 8, this.y + this.height - 2); // Extend the side upwards
    this.ctx.closePath();
    this.ctx.fill();
}
¶ 3.4 Activating the Editor Control
There are two modes for activating a custom editor: single-click mode and double-click mode. Choose one based on your requirements.
¶ 3.3.1 Single-Click Trigger
public CellClick(event: MouseEvent): void {
    // this.popFrom.openModal(this.drawText, this);
}
¶ 3.3.2 Double-Click Trigger
public CellDbClick(event: MouseEvent): void {
    this.popFrom.openModal(this.value, this);
}
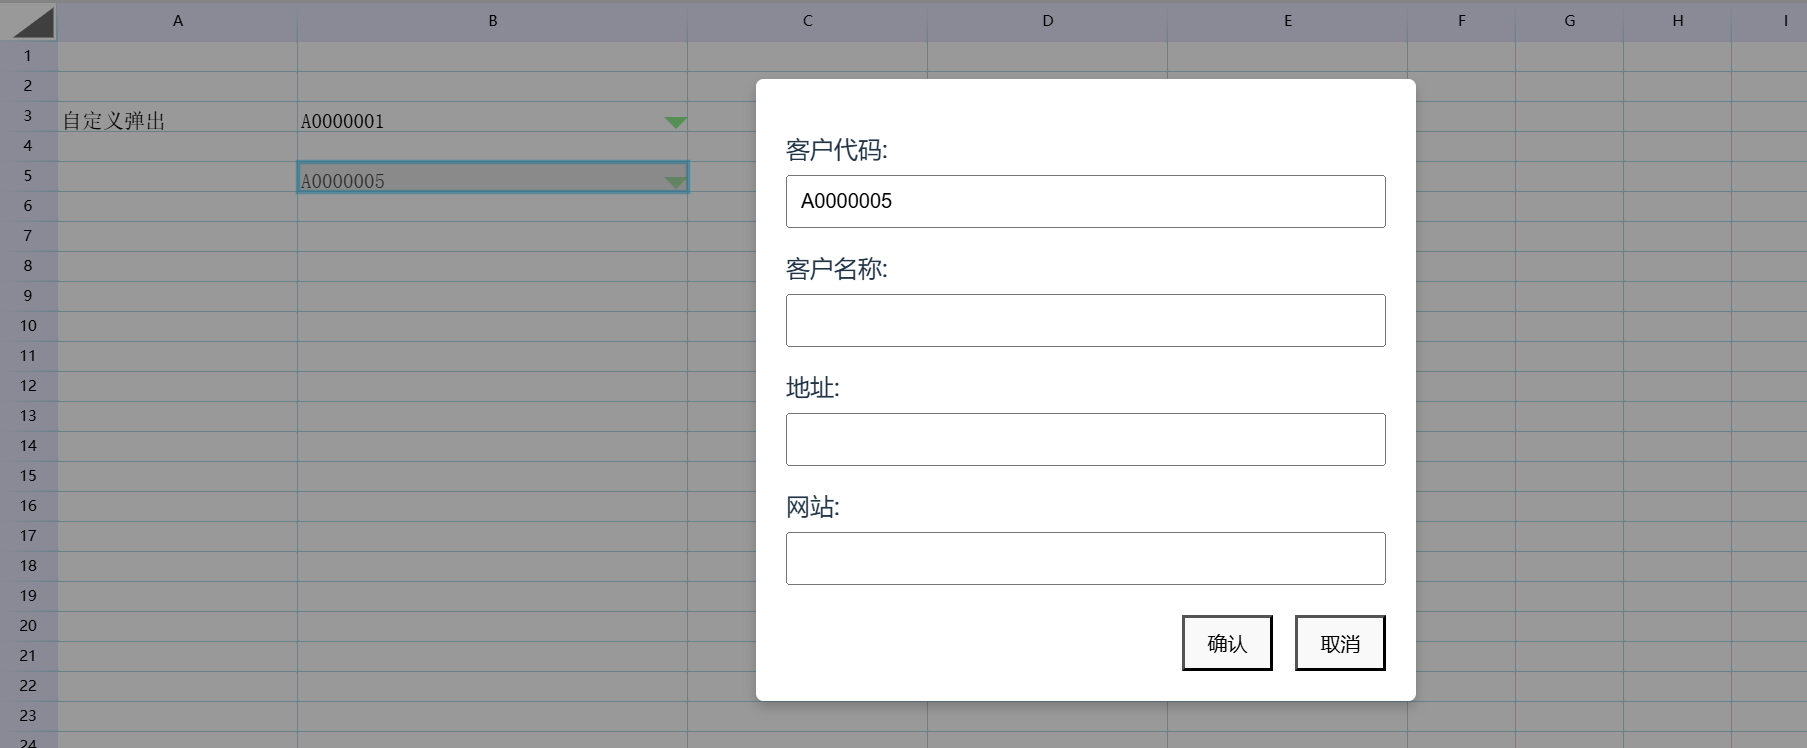
Here, the openModal method defined in Section 3.1 is called to activate the display page. The value of the cell and the editor are passed to the display page. Finally, after the user confirms, the SetCellValue method of the passed this object is called to return control to the websheet control.
¶ 3.4 Result Display

¶ 3.5 Partial Code
<!DOCTYPE html>
<html lang="en">
<head>
  <style>
    .modal {
      display: none;
      position: fixed;
      z-index: 1;
      left: 0;
      top: 0;
      width: 100%;
      height: 100%;
      background-color: rgba(0, 0, 0, 0.4);
      justify-content: center;
      align-items: center;
    }
    .modal-content {
      background-color: #fff;
      padding: 20px;
      border-radius: 5px;
      width: 400px;
      box-shadow: 0 4px 8px 0 rgba(0, 0, 0, 0.2);
    }

    /* Form layout */
    .form-group {
      margin: 15px 0;
    }

    label {
      display: block;
      margin-bottom: 5px;
    }

    input {
      width: 95%;
      padding: 8px;
    }

    /* Button group */
    .button-group {
      text-align: right;
      margin-top: 20px;
    }

    button {
      padding: 8px 15px;
      margin-left: 10px;
      cursor: pointer;
    }
  </style>
  <meta charset="UTF-8">
  <title>websheet Demo</title>
  <link rel="stylesheet" href="../dist/style.css">
</head>
<body>
  <div id="myModal" class="modal">
    <div class="modal-content">
      <form id="customerForm">
        <div class="form-group">
          <label>Customer Code:</label>
          <input type="text" id="customerCode" readonly>
        </div>
        <div class="form-group">
          <label>Customer Name:</label>
          <input type="text" id="customerName" required>
        </div>
        <div class="form-group">
          <label>Address:</label>
          <input type="text" id="address">
        </div>
        <div class="form-group">
          <label>Website:</label>
          <input type="url" id="website">
        </div>
        <div class="button-group">
          <button type="button" id="submitForm">Confirm</button>
          <button type="button" id="closeModal">Cancel</button>
        </div>
      </form>
    </div>
  </div>

  <div id='yourElement'>
  </div>
  <script type="module">

    class PopFrom {

      static #instance;
      constructor() {
        if (!PopFrom.#instance) {
          PopFrom.#instance = this;

          document.getElementById('closeModal').addEventListener('click', this.closeModal);
          this.submitDate = this.submitDate.bind(this);
          document.getElementById('submitForm').addEventListener('click', this.submitDate);
          this.click_number = 1;
        }
        return PopFrom.#instance;
      }

      openModal(code, editCell) {
        document.getElementById('customerCode').value = code;
        document.getElementById('myModal').style.display = 'flex';
        this.EditCell = editCell;
      }

      submitDate() {
        const formData = {
          code: document.getElementById('customerCode').value,
          name: document.getElementById('customerName').value,
          address: document.getElementById('address').value,
          website: document.getElementById('website').value
        };
        console.log('Your data:', formData);
        // Modify the cell data by setting 'ABCDEFG'
        this.EditCell.SetCellValue('ABCDEFG' + this.click_number++);
        this.closeModal();
      }

      closeModal() {
        document.getElementById('myModal').style.display = 'none';
      }
    }

    let yourElement = document.getElementById("yourElement");
    let wsheet = new websheet('HTML', yourElement);

    class PopEditCell extends websheet.Model.BaseCell {

      /**
      *
      * @param x  X-coordinate of the cell's starting position
      * @param y   Y-coordinate of the cell's starting position
      * @param width Width of the cell
      * @param height Height of the cell
      * @param Document
      */
      constructor(canvas, ctx, x, y, width, height, document) {
        super(canvas, ctx, x, y, width, height, document); // Must call the parent class
        // Initialize your own variables
        this.popFrom = new PopFrom();
        this.name = 'PopEditCell'; // Name of the control
      }

      Draw() {
        super.Draw(); // Must call the parent class
        // Your code here
        this.drawArrowWithPath();
      }

      // Draw arrow and box
      drawArrowWithPath() {
        // Draw a green inverted triangle
        this.ctx.fillStyle = 'lightgreen';
        this.ctx.beginPath();
        this.ctx.moveTo(this.x + this.width - 16, this.y + this.height - 10); // Bottom-right vertex
        this.ctx.lineTo(this.x + this.width, this.y + this.height - 10); // Extend the base to the left
        this.ctx.lineTo(this.x + this.width - 8, this.y + this.height - 2); // Extend the side upwards
        this.ctx.closePath();
        this.ctx.fill();
      }

      // public CellClick(event: MouseEvent): void {
      //   alert('CellClick');
      // }

      CellDbClick(event) {
        // alert('CellDbClick');
        this.popFrom.openModal(this.value, this);
      }

    }

    /**
    * Step 1: Get the active sheet
    */

    let activeSheet = wsheet.ActiveSheet();

    activeSheet.SetCellValue('A3', 'Custom Pop-Up');

    /**
    * Step 2: Customize the editor and register it
    */

    activeSheet.SetCellValue('B3', 'A0000001'); // Set a sample value

    activeSheet.setCellEditor('B3', PopEditCell);

    activeSheet.SetCellValue('B5', 'A0000005'); // Set another sample value
    activeSheet.setCellEditor('B5', PopEditCell);

    /**
    * Step 3: Redraw the table
    */
    activeSheet.setColWidth(1, 160);
    activeSheet.setColWidth(2, 260);
    activeSheet.setColWidth(3, 160);
    activeSheet.setColWidth(4, 160);
    activeSheet.setColWidth(5, 160);
    activeSheet.WorkFormula(); // Rebuild formulas
    activeSheet.cacl(); // Calculate formulas

    wsheet.BuildSheet();
    wsheet.Draw();

  </script>

  <script type="text/javascript" src="../dist/websheet...."></script>
</body>

</html>